Monday, January 31, 2011

New toys for me-Yippee!!

It's Monday and I am finally back home in Minnesota. 
Look what was waiting for me. I can't wait to start using it all. 

Be sure to keep checking back this week for my More than Favors Guest Designer Post. I will give you a hint-I used one of my new toys pictured above. Can you guess which one?

Saturday, January 29, 2011

Mini Notes

Hey everyone. Hope everyone is having a great weekend. Did you guys all see the post over at My Pinker Stamper. 10 New stamps sets- Holy Moly! I better start saving my pennies now. 

Ok- one day left and I get to go home. I do have to say the weather is a bit warmer than Phoenix. Tomorrow is the ING Miami Marathon. Part of the weekend events included a 5K run. Well, I ran and had a pretty good time, not to mention a big medal for finishing.

It has been a busy 8 days. I just don't have the energy to try and make anything tonight- especially since I have limited tools and supplies. So my post today is a set of mini note cards that I had done a bit ago, but they are sooo cute.
These are great for quick little gift cards or as a gift set in the cute card holder.  All cuts on the cards are from one of my favorite cart, Create a Critter. Cut sizes vary. Finished card size is 3" square or 6" x 3" folded in half. Sentiments are all from My Pink Stamper stamp sets. Directions for the mini magazine holder can be found here
Hope you all give it a try and create your own special designs.
I hope you come back next week when I am a guest Designer over at More than Favors.

Friday, January 28, 2011

Hugs & Love

Happy Friday everyone. I am on the downhill of my travels this week. On a plane now from Phoenix to Miami. I will finally be on my way home Sunday night, back to the frigid Minnesota weather. I am trying to soak up all the sun I can.

As I was packing last night, I just had to pull out my little scrap bag and see what I could cut, stamp, chalk, glue...well, you get the idea. If you have been reading the past week, you know I have very limited supplies with me. Fortunately, I did find a store not far from the hotel, Scrapbooks, etc in Mesa, AZ,what a great store. I found a great EK  Succes border punch, some rub-ons, buttons and some cool patterned paper.

I was challenged once again to make something without a Cricut. Can you even imagine!

In my pajamas, American Idol on the TV, and eating PB M&M's (yes,not a healthy dinner), I began the creative journey. This is what I came up with. I actually am quite pleased and think it's pretty cute. 
Here's how I did it...
White card base is Bazzill Daisy embossed card stock cut 5.5" by 11" and folded in half for a square card
Pattern paper cut 4"x4" from Fine and Dandy-Tickled pink "cherry" paper
Pattern paper cut 5.5" x 1.5" from Fancy Pants- love dots paper and border punched border on each side with EK double crocheted lace punch
Blue paper torn in a random fashion to frame the stamped image
Stamped image is from SU Greeting Card kids stamp set colored with copic markers
Sentiments are from My Pink Stamper Love-alicious and Simply Sweet Occasions 
stamp sets
Pearls stickers from Michael's
Heart die cut and pretty blue button
Brown chalk for edges, a little doodling with my white gel pen, pop dots for heart and button

I have entered it over at the Tuesday Throwdown challenge.

Thursday, January 27, 2011

I'm Going to be a Guest Designer X 2--Oh my Goodness!!

You may have noticed a couple new buttons on the right side of the blog. One for More Than Favors and one for the Pink Cricut. I have received word this week that I have been asked to be a guest designer for both! I can hardly believe it.

Watch next week for my project on More Than Favors!

My submission for the Pink Cricut Design Team member consideration was this recipe page. Be sure to jump over to see all the new Design Team members here.
I am honored, excited, proud and nervous as I begin to think of what projects I will come up with. Keep watching to see what I come up with and wish me luck!!

My Pink Stamper also has a challenge this week to make something yummy. Check it out.

Wednesday, January 26, 2011

I Think Pink!

This post is dedicated to a special aunt who is in the hospital right now. I am thinking of you and sending you well wishes RL.


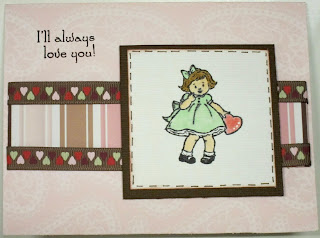
Yes, it is a pink card. I think I have plenty of Valentine's cards now. But, it is that time of year and there are so many cute things to stamp, cut, etc. When I was doing the black and white card a few nights ago in my hotel room, I also stamped and colored a few additional SU Greeting Card kids images. Nothing wrong with black and white, but it was screaming for color. I did two, one with a green dress and one with a blue dress.  I was inspired to use the one with the green dress after hearing what the Wacky Wednesday Challenge is over at More Than Favors. The challenge is to use pink, green and brown on a project.

I am also super excited to announce that I will be a guest designer over at More Than Favors next week. Please be sure to follow and watch for my project. I hope I can do a good job.


Now back to this card.


Here's how I did it...
Pink paper from Lasting impressions
Striped card stock from Pebbles New Arrival- the stripes are embossed - very cool.
Paper scraps from my stash
Copic markers
SU Greeting Card kids stamp
Sentiment from My Pink Stamper Love-alicious
Pop dots to raise the stamped image.

Happy Belated Birthday Robyn!

It's Robyn's birthday over at My Pink Stamper- actually it was actually Monday so I am a bit late. Had to find a way to sneak out to a local Micheal's here in Arizona to find some paper that was fitting. So here is it Robyn- I hope you enjoyed your day!
Here's how I did it...
Cards stock base with happy birthday pattern paper. 
Found a sheet that had border and embellishment die cuts. 
Added those and then used the sentiment from My Pink Stamper Sweet Occasions stamp set. 
Added some string for a bow and we have a birthday card.

I Treasure You

Good morning everyone. Today is day 6 on the road. Boy, they really need to come up with a mini portable Cricut! As I have mentioned in a couple earlier posts, I brought a few things with me so I could keep up with my posts. I had also crafted a few items quickly before I left that I wanted to share as well. One of them was this cute little card that would be perfect for a little boy for Valentine's day. About a year or more ago, I hosted a themed scrapbook retreat weekend for friends and family, A Pirate's Life for Thee. We had such a good time. I had a bunch of stuff leftover from making invites, gift cards etc. So when I saw this cute pirate boy from B is for Boy, I knew I had to did out that old pirate paper. Ironically,  the Cricut Cardz Challenge this week is to make a valentine's card for a child. Be sure to hop over there to check out the design team and other entries. There are some adorable things over there.


Here's how I did it....
Bazzill grey paper for card base
Pattern paper was was from a Karen Foster Pirate line
All other paper are scraps from my stash.
Coin and treasure chest stickers were leftover from my pirate them retreat
Sentiment from Scrappy Moms Designer Choice Stamp set
Pirate and all his layers cut at 3.75" from B is for Boy and adhered with pop dots
A bit of black ribbon and my gel pen for doodles

Tuesday, January 25, 2011

Be Mine

Well, it is Tuesday and I am still on the road. So far, I think I am on track to keep up with my posts while working crazy days. You will notice, my posts are late at night or early in the morning. The only spare moments I get. 

This is probably my favorite card so far this month, next to my Chillin' post.
The cut is just so sweet from the Sweathearts cartridge. I think I will have to make a few more of this one for sure.

Here's how I did it...
Bazzill pink card stock fro card base
Corner rounder punch t punch card base and patterned paper.
Pattern paper found at  my local craft store. 
Scooter girl and all layers cut at 4" from Sweathearts cartridge, p. 37 with all paper from my scrap stash.
Snippet of brown satin ribbon from my ribbon tote.
Silver brads
Beige string for basket
irock gem for earring
Be Mine Stamp from My Pink Stamper Love-alicious stamp set
Stickles and doodles with my gel pen and of course some pop dots

This cute little card will be posted for the following challenges.
Have a fantastic and creative day!

Monday, January 24, 2011

Food Fare

Hope everyone is enjoying the weekend.I have been trying to come up with a cool name for my new tab on this blog where you will be able to find posted recipe scrap pages. Not sure I love it, but it works. Welcome to Food Fare. This will be the new home of images for any recipe page I post. That way you all can come back at anytime and grab a recipe. If at anytime, the recipe is hard to read, just send me a note and I will be glad to forward a copy via email 
If you missed my first recipe post, you can find it here.
Here is the next one. These are really yummy.
Here's how I did it...
Pattern page/page cut to 8x8
Monsters and lamp post cut from Mini Monsters cart.
Font and shadow font cut from Feeling Groovy cart
Maratha Stewart drippy goo border punch. 
Added some chalk, doodles with my gel pen and some squiggle eyes.
Enjoy!! 
This project can also be found posted for the Monday challenge over at Fantabulous Cricut for the Challenge Me Monday #44 Challenge and at Penny's Paper Challenge

Sunday, January 23, 2011

Black and White

Gotta love the warm weather. Well, I am am traveling this week for work, but at least it is someplace warm, Arizona. Beats the below zero temps in Minnesota. So my challenge this week is to try and keep the blog updated. I tossed in a handful of scrap items into my suitcase, so the challenge is to work with what I got. 
Thank goodness I found a Micheal's close to the hotel today to buy a couple sheets of paper so I could enter into a challenge that Crafting with Christina is hosting. The challenge was to make a card using only black, white and grey (silver ok too). I also saw, late last night, someone's blog hosting a challenge to use clear overlays. I did not book mark it and cannot remember where it is right now. Once I find it I will link it here because this card fits that challenge as well. If you know who is hosting that challenge, please tell me. Here is what I came up with.

Here's how I did it...
Bazzill black paper for base
Pattern paper from Micheal's
Sticker crystals from Michale's on clearance as well as the clear overlay
White die cut was a pre-cut die from a paper store
Sentiment from My Pink Stamper Love-alicious stamp set
Mini hearts from My Pink Stamper Simply Sweet Occasions Stamp set
Cute girl from SU Greeting Card Kids
Mini hearts from My pink Stamper 
Silver embossed strip is a scrap I had.
I used pop dots carefully under the overlay for dimension and then used the crystal stickers to cover the pop dots.

Whoohoo!!!!! I have 50 followers!!!

(my arms waving in the air), YES, I hit 50 followers!!!

Thanks Janet , Lady Love Bug, for being my 50th follower,  AND to everyone for helping me hit my goal before Feb 1. It's going to be a great day!!
Thank you to everyone for following and leaving such wonderful comments.
Now my next mini goal will be to hit 100 by March 1. Have a great and creative day!

Saturday, January 22, 2011

Stylish Blogger award strikes again!


I can't believe it, three blog awards in about a week. Awesome. Thank you so much to Janice over at Cricutology for recognizing my new blog. There are so many great blogs with talented designers, that this is a privilege to be recognized. Thank you!

Upon receiving this award I must thank the person who gave this to me and link it back to their blog and share 8 things about myself. Also, pass along the award to 8 other individuals that I have recently discovered and leave a comment so that they can pass along the recognition.

 Here are 8 of their blogs in no particular order that I have found from projects they have posted on some challenges I am participating in. Check them out. 

Snowman Challenge

This is a quick post since I am out of town this week on business. I am going to try and keep up to date with the posts, wish me luck. 
This challenge comes from Cricut Cardz Challenge blog.  I did a snowman box card that has a little gift, some hot cocoa. I love using the cute little decorative cocoa packets. I decorate these card boxes based on what is on the cocoa packet. My inspiration comes from an old post I found on Mrs B's craft room blog. She does beautiful work. So here is my version.  The inside of the box card has a window for the cocoa packet picture to show through.


Here's how I did it...
Cut the box following instructions from Mrs B's Craft Room video, link is above.
Snowman and all layers cut from WinterFrolic, p.31 at 3.5" 

Paper from my scrap stash.
Added Peachy keen face stamp for nose and some stickles.
Sentiments from My Pink Stamper Winter Punnies stamp set.
Doodles with gel pen and fine tip brown marker

Friday, January 21, 2011

Cricutology Give Away

Oh, almost to 50 followers, thank  you!!! I know for you seasoned bloggers, 50 is a small number, but I am setting small goals, and taking it one step at a time. I would love to blow this goal out of the water and maybe even hit 100. 

Speaking of 100...Janice over at Cricutology has reached 100 followers and is doing a give a way to celebrate. Link on over there by clicking here to enter and maybe win. Good Luck.

Bunny Love

Happy Friday!!! 

I am getting close to my goal of 50 followers by Feb 1. Thanks for your help and sending your friends over. If you're not a follower, I would love it if you were. 

Now onto business...
It's another Throw Back Thursday Challenge over at My Creative Time.
The challenge is to use the Paper Doll Dress up or Every Day Paper Doll carts for any project of choice, AND you must use either heat or dry embossing it. Hop over there to see what her designers have come up with for this challenge as well as how they are using the new Peachy Keen Stamps that were just released last night. The new stamps are sooo cute- I need to order them. They are also having they Faces Friday challenge.

So for my entry I wanted to use the sentiment "Some-Bunny Loves You!" from the Scrappy Moms Charmed Life stamp set. I know, an odd way to start a project- usually you design and then add a sentiment. I heat embossed the white paper for a tone on tone look. It's kind hard to see on this, picture, but it was a stamp that I had from Northwoods Stamps that has a pattern of dots and little flowers. This was the first time I tried heat embossing. It's kinda easy. I found the sentiment does not stamp well over it, however. In the end it turned out cute.

Here's how I did it...
Bazzill pink card stock for card base
White card stock stamped with Northwoods stamp and heat embossed with clear embossing powder 
Pattern paper from Cosmo Cricket
All other paper from my scrap stash
Paper Doll Dress Up Cart: body using black out feature and outfit on p.70 and hair on p. 67 all cut at 3.5"; be sure you have your paper saver button on so it all cuts to the correct size
Sentiment from Scrappy Moms "The Charmed Life"
Peachy Keen Happy Lashes stamp for face
Cuttle bug embossing folder, Swiss Dots for heart punched with small CM heart punch
Border punch- can't remember the name of it, I should really label them when I get them
A little ribbon, doodles with the gel pen and pearl stickers for the buttons.

Thursday, January 20, 2011

A Bird-Day card


Here is a quick and easy birthday card for any  bird lover on your list. The sentiment inside the card reads...it's your bird-day.
Here's how I did it... 
All paper from my scrap stash
Birds cut at .75" and 1" from CM Cheerful Seasons cartridge; I used the flip feature on my Expression for the larger bird.
Birdhouse and all layers cut at 3.5" from CM Cheerful Seasons cartridge.
Doodled with gel pen, chalked all edges, and added black sticker pearls for bird eyes.
Sentiment from My Pink Stamper Tweetie Hoo Puns stamp set
A ribbon with a bow and pop-dots for the birds.

Cricut Cartridge Chaos Challenge

Paula over at More Than Favors has weekly challenges using different Cricut Cartridges each week called Cricut Cartridge Chaos.
Looked like fun so I pulled out my Mini Monster Cricut cartridge, which is the cartridge to use this week, to see what I could do. This is one of my favorite carts. My card is a bit "out of this world" with some wacky colors. Don't ya just love those eyes. I found them at my craft store in the doll aisle, lashes and all.


Here's how I did it....
Pattern paper is from Anna Griffin, Imaginations, Creative Memories and scraps from my stash
Card base is cut at 5.5" from Wild Card, p.51
The circle frame is cut at 3.20" from Wild Card, p.39; I placed the frame on top of the card base and hid the outer circle on my gypsy before cutting to be sure the opening on the base matched the opening on the frame.
Punched a yellow circle with my CM large circle punch
Sentiment is from Scrappy Moms A Haunting We will Go stamp set
Stickles, chalk, doodles with my white gel pen and a scrap piece of ribbon stapled on the inside complete this project.

Wednesday, January 19, 2011

It's a LOVE BUG gift card holder.

Wow- what a busy work week so far. Working long 12 hour days doesn't leave much time for creativity, but it is what I do to unwind after such a long day. So here is what I put together for you all tonight, had to get it done and posted before I can watch American Idol. Thank goodness for Tivo!

This is a cute little bug sending a little love along with a surprise gift inside.


Here's how I did it...
Start with a 5.25" tall by 12" wide piece of card stock for card base. I scored it at 4.25" from each short edge and again at 6". I then folded it to form a little pocket inside and glued it down. Be sure to NOT put adhesive on the center fold or you won't be able to get the gift card inside.

The trick was to then punch an opening on this pocket inside to be able to slip a gift card inside. This would be easy if you have a punch that just punches a narrow opening, but I don't have one of those, so I had to get creative with what I  have. I used my CM tag punch, it has a rounded corner so I could get that rounded edge on the side. I had to punch it twice to get the rounded edge on each side. I then used a CM circle punch to punch a little curve in the center. I am sure I am not explaining this well, so hopefully you get the idea from the picture.

Lady bug and all layers cut from Create a Critter, p.66 at3.25"
Love bug title and layers cut from Create a Critter, p.66 at 2.5"
Additional hearts for title punched from CM mini heart punch
Valentine's Day sentiment from My Pink Stamper Happiest Moments stamp set
Mini butterfly on title from Scrappy Moms Designers Choice stamp set
Paper from my scrap stash
Some ribbon and doodles with my gel pen 

I have also entered this into the Paper Playtime Challenge this week and More then Favors Wacky Wednesday Challenge.  Please stop over and take a look at all the other great entries.

Tuesday, January 18, 2011

My First Blogger Award!

I am ecstatic this morning. I found out last night and this morning that I have received my first blogger award from two different fellow bloggers!

Lisa over at Pretty Paper, Pretty Ribbons and 
Janice at Cricutology both have  received this award as well, which is very much deserved, and they both have passed it along to me.


This makes me so proud. Thank you  everyone for  following and reading my daily posts. 

 To accept this award need to:

1. Thank and link back to the person who awarded me
2. Share 8 things about myself
3. Pay it forward to 8 bloggers I recently found
4. Contact those bloggers and tell them about their award

Here are the eight things about myself:

1. I, Barb, am a full time corporate meeting planner
2. I live in Minesota and have all my life
3. I love to travel and when I travel I seek out scrapbook supply stores
4. I am a big hocky fan
5. I enjoy planning themed scrapbook retreat weekends for my friends and family
6. I am married and have a son in college
7. I am obsessed with getting all the new cricut cartridges that come out, however, my budget does not always allow me to
8. I love reading other scrapper blogs and seeing their great  ideas.

There are several blogs I follow by some extremely talented people, but the ones I have recently come across are below and I recommend you check them out as well.

Thank you once again for making my blog such a huge success so quickly!

Monday, January 17, 2011

A Sweet Treat for all of you!

Happy Martin Luther King day. 
Fortunately, that means I get the day off. However, anyone that really knows me, knows that I never take a day off. Thanks to Blackberry, I am reachable and can read my email anytime and almost anywhere. I did find a little time to have lunch with some friends and put together a little something sweet for all of you.

So here it is. I tried something new and cut the front half of the card off and gave it a scalloped edge vertical border. This way the sentiment is on the front and inside of the card. A double duty sentiment. But, it really does speak the truth. So this card is for all of my virtual blog friends out there.

Here's how I did it....
Pink card stock for card base is Bazzill
Pink pattern paper inside card is Fancy paper; First Date.
The cute Brown pattern paper is Sprinkled with Love from Imaginisce 
Additional paper from my scrap stash
Candy truffle and all layers cut at 2" from Winter Frolic, p. 60
Cake plate cut at 1.5" from Sweat Treats, p. 42
Sentiment printed on my own computer
Scallop border punch for the border edge
Brown chalk and a gel pen for doodles
Teal ribbon

You can find links to this card over at SPCC, My Creative Time, and over at Fantabulous Cricut, take a look and jump in on the fun!

Sunday, January 16, 2011

Over the Moon!

I am kinda stuck on Valentine's day and trying to look at different images besides hearts for Valentine's cards.
I  was looking at the B is for Boy cart. There sure are some cute things on it not to mention simple cuts, only 4 layers for each item which means as little as 4 pieces of paper.
I decided to use the little rocket on this cart. I couldn't find a stamp sentiment that I liked so I did my  own.

Here's how I did it...
Grey card stock for the base
Rocket and all layers cut at 4.5"
Circle cut at 3" and embossed with the Sizzix folder, Rays
Sentiment printed and then cut the cloud shape using the center point feature on the Cricut The cloud shape is from Create a Critter
Martha Stewart bakers twine, yellow stickles and white gel pen for doodles
Scraps from my paper stash

Saturday, January 15, 2011

Thanks Snow Much!

First of all, thank you to everyone who has left such nice, kind comments on my blog the past couple weeks. I truly enjoy ready each one. 

Also, a shout out and thank you to all my new followers. I hit 25 today - WOW- I am so excited. 
Please help me to continue to grow my follower list. I would love to hit 50 by February 1st.
Send your friends over.

This card started as an idea to build a snowflake frame. Well, it is one of those projects that took way more time then it should have. The colors are not the typical colors you would think of for a snowman card, but it seems to work. The welding for the frame and card where all done on the gypsy.

I am thinking this will be a great card for the neighbor guy that comes around the block with his snow blower to save my husband some shoveling time. We certainly have had enough snow already this year in Minnesota.
Here's how I did it...
Paper scraps from my Stash
Welded frame and snowflake corners on gypsy using Home Accents Cartridge
Snowflake Cuttlebug folder for texture
Snowman cut at 2.75" from Snow Friends Cartridge
Sentiment from My Pink Stamper Winter Punnies
Snowman face from Peachy Keen Happy Lashes
Added some doodles with gel pen and a few sparkles with the irock


I am entering this card in the Peachy Keen Let's Face it Friday Challenge

Friday, January 14, 2011

Pink Stamper Blog Hop

Tonight I followed My Pink Stampers first blog hop.
This too, was my first blog hop. I have started some and stumbled across a few posts regarding blog hops, but have never done one from start to finish.
It's not too late to hop on over and start it yourself. You will see all the new design teams blogs as well as their great projects. 
As an Honorable Mention, thanks Robyn, I am making myself an official virtual design team member and jumping on board to participate tonight.
After hopping from blog to blog, I collected special words to make a sentence. Kinda like a scavenger hunt. The words spelled out a challenge so that we all could join in on the fun!
That means you can too!

Once I collected all my words to know what I needed to do, I got straight to work. This is what I came up with using the color pink and My Pinker Stamper stamp set, Tweetie Hoo Puns.
Here's How I did it....
Background paper is from Fancy Pants; Bunches of Love along with scraps from my stash
5" x 5" card using red card stock
B is for Boy cartridge to cut background layer - re-sized it on my gypsy to 4.5" x 4.5"
Bird couple and all layers cut at 4.5" from Sweethearts Cartridge, p.67
Cuttlebug embossing folders, swiss dots and distressed stripes for birds and nest
Hearts from Creative Memories large heart punch
Sentiment from My Pink Stamper Tweetie Hoo Puns stamp set
Cute button with string
Doodles with the gel pen
Sticker pearls for necklace and eyes. Girls gotta look good for her guy, right?

Hope you give the Blog Hop a try!

Thursday, January 13, 2011

An Old Fashion Valentine

Yup- you guessed it, another challenge entry. 

This time, Erin Lee has announced her Music Monday Challenges. Check it out, it is quite fun and a great idea, being inspired by a song. 
When listening to the song for this challenge, I knew I was going make a valentine's card. 
I had recently come across some old valentine's card and thus the inspiration hit me, I would make an old fashioned/retro looking  valentine's card.

The card base is a couple shapes welded and cut as one piece. I used my gypsy, but if you have DS you can do it as well. The base of the card is made using a heart and frame shape from Lacy labels.

He reminds me of a valentine card I would have gotten in grade school. 
I am willing to share my gypsy file for this card, just click the contact button at the top of my blog and send me a note.

Here's how I did it...
Striped paper is from Three Bugs in a Rug, all others are scraps from my scrap box.
Card and hearts cut from Lacy Labels cartridge
Dog and all layers cut at  3.75" from Paisley cartridge p.34
Crazy in love cut at 1.38" from Paisley cartridge p. 60
Added a gem on the star with my irock
Doodled with white gel pen and chalked edges in brown

Scrappy Moms Terrific Tuesday Challenge


That's right, another challenge entry for me. All of a sudden I can't resist one. 
They have so many cute ideas over there at Scrappy Moms Stamps and they are starting Tuesday challenges on the 2nd and 4th Tuesday of each month. All entries are placed in a drawing the end of the month for a prize. Gotta Love prizes.

The first challenge is to use a cut from the Birthday Bash cartridge.  This card is a bit plain, but gets the point across. It is super simple and quick to make. 
So if you need a birthday card in the next 30 minutes, you can do it!!


Here's how I did it...
All paper is from my scrap box
Punched the green with a Martha Stewart border punch 
Cut the B'day cake from Birthday Bash, p 25 and all layers at 4"
Embossed the cake layer, but you do not need to if you pressed for time.
Added some ribbon and stickles.
Sentiment is from Scrappy Moms Stamp set Simple Sentiments.

Pop it in an envelope and instant Birthday card.

Wednesday, January 12, 2011

Chillin' Peachy Keen Challenge Entry


Peachy Keen Stamp Blog is having a sketch challenge. 
The challenge is to create a card or layout based on the sketch to the left.

For my CHILLIN' version I made a 5x5 card usng one of my favorite cartridges, Creat a Critter.
I used Bazzill paper for the  base, Echo Paper 's Snow from the Winter Time collection, scraps from my scrap box and a bit of vellum.

How I did it...
Cut circle frame and frame shadow at 3.25" from Reminisce CM cartridge on p. 68
I used vellum for the shadow frame and embossed it to give it an ice look.
The Penguin and all layers are cut at 2.25" from Create a Critter. 
I used the Peachy Keen Winter Faces stamp set for his sweet face. Added stickles to his scarf & glossy accents for the eyes and mouth.
Used my Martha Stewart drippy goo border punch for my icicle border.
Attached the penguin and frame with pop dots.
Sentiment is from Scrappy Moms Charmed Life stamp set. 
I originally cut the penguin at 2" before I determined he was too small, so I added him on the inside of the card.

You can also find it in the It's Cold outside Challenge.


Tuesday, January 11, 2011

Winter Warmies Challenge

Fantaublous Cricut is having a "Winter Warmies" Challenge.
The challenge is to create using some type of winter clothing/accessory on your project (i.e.: mitten, sweater, hat etc.)and include an image cut using your Cricut on your project.

I have been wanting to use this bunny for a while so here was the perfect opportunity. Can't you just hear him screaming going YIPPEE down the bunny hill!

Here's how I did it.
Cricut Cartridge: Winter Frolic; bunny p.33 cut with all the layers at 4"
Paper: Paper Company Natural card stock for base, Crate Paper-Flakes from their snow days collection along with scraps for the bunny.
Sentiment: Scrappy Moms Designers Choice Stamp set
Misc ribbon, stickles and white gel pen doodles 

Enjoy your day!!